All web applications need to manage security. Managing security means controlling who can access your application, and determining what they can do. Security is not an afterthought that can be added to protect a working system. Instead security should be an important design element that you consider as you build your Zope applications.
In this chapter you'll find out how to create and manage user accounts, and how to control how users can use your application by creating security policies.
Security controls what the users of your site can do and how you and others can maintain your site. If you carefully consider security you can provide powerful features to your users and allow large groups of people to safely work together to maintain your site. If you do not consider security, it will be difficult to give your users control safely and managing your site will become a messy burden. Your site will suffer not only from people doing harmful things that they shouldn't be able to do, but it will be hard for you to provide value to your users and control to those who manage your site.
Zope weaves security into almost every aspect of web application building. Zope uses the same security system to control Zope management as you use to create users for your application. Zope makes no distinction between using and managing an application. This may seem confusing, but in fact it allows you to leverage Zope's security framework for your application's needs.
As we saw in Chapter 2, "Using Zope" you log into Zope by going to a management URL in your web browser and entering your username and password. We also pointed out in Chapter 2, "Using Zope" that because of how most web browsers work, you must quit your browser to log out of Zope.
If you attempt to access a protected resource for which you don't have access privileges, Zope will prompt you to log in. This can happen even if you're already logged in. In general, there is no need to log in to Zope if you only wish to use public resources.
Security in the broadest sense controls two functions, authentication and authorization. Authentication means finding out who you are, and authorization means determining what you can do. Zope provides separate facilities to manage the processes of identifying users and granting access to controlled actions.
When you access a protected resource (for example, by viewing a private web page) Zope will ask you to log in and will look for your user account. This is the authentication process. Note that Zope will only authenticate you if you ask for a protected resource; if you only access public resources Zope will continue to assume you are anonymous.
Once you've been authenticated, Zope determines whether or not you have access to the protected resource. This process involves two intermediary layers between you and the protected resource, roles and permissions. Users have roles which describe what they can do such as "Author", "Manager", and "Editor". Zope objects have permissions which describe what can be done with them such as "View", "Delete objects", and "Manage properties".
Security policies map roles to permissions; in other words they say who can do what. For example, a security policy may associate the "Manager" role with the "Delete objects" permission. This allows managers to delete objects. In this way Zope authorizes users to perform protected actions.
In the following sections we'll look more closely at authentication and authorization and how to effectively set security policies. First you'll learn about authentication using users and User Folders, then you'll find out about controlling authorization with security policies.
A Zope User defines a user account. A Zope user has a name, a password, and optionally additional data about someone who uses Zope. To log into Zope, you must have a user account. Let's examine how to create and manage user accounts.
To create user accounts in Zope you add users to user folders. In Chapter 2, "Using Zope" you should already have added a Manager user to your top level user folder.
Let's create a new user so that your coworker can help you manage your Zope site. Go to the root Zope folder. Click on the user folder named acl_users. The user folder contains user objects that define Zope user accounts. Click the Add button to create a new user.
Figure 6-1 Adding a user to a user folder.
The form in Figure 6-1 lets you define the user. Type a username for your coworker in the Name field, for example, "michel". The username can contain letters, spaces, and numbers. The username is case sensitive.
Choose a password for your coworker and enter it in the Password and (Confirm) fields. We'll set things up so that your coworker can change their password later when they log in. You might want to use a password like "change me" to help remind them to change their password.
The Domains field lets you restrict Internet domains from which the user can log in. This allows you to add another safety control to your account. For example if you always want your coworker to log in from work you could enter your work's domain, for example "myjob.com", in the Domains field. You can specify multiple domains separated by spaces to allow the user to log in from multiple domains. For example if you decide that your coworker should be able to manage Zope from their home account too, you could set the domains to "myjob.com myhome.net". You can also use IP numbers with asterisks to indicate wild card instead of domain names to specify domains. For example, "209.67.167.*" will match all IP addresses that start with "209.67.167".
The Roles select list indicates which roles the user should have. In general users who are performing management tasks should be given the Manager role. In the case of your coworker, select the Manager role. The Owner role is not appropriate in most cases because a user is normally an owner of a specific object, not an owner in general. We'll look at ownership more later in the chapter. We'll also see later how you can define your own roles such as Editor and Reviewer.
To create the new user click the Add button. You should see a new user object in the user folder.
You can edit existing users by clicking on them. This displays a form very similar to the form you used to create a user. In fact you can control all the same settings that we just discussed from this form. After your coworker logs in with the account you created for them, they should go to this management screen and change their password here.
Like all Zope management functions, editing users is protected by the security policy. A user can only change their password if they have the Manage Users permission, which managers have by default.
So by default it's possible for a manager defined in a given user folder to change other managers' accounts if they both are defined in the same user folder. This may or may not be what you want. Later we'll look at ways to avoid this potential problem. Rest assured that it is not, however, possible for someone to find out your password from the management interface. Another manager may have access to change your password, but not find out what your current password is without changing it.
In general, user folders work like normal Zope folders; you can create, edit and delete contained objects. However, user folders are not as capable as normal folders. You cannot cut and paste users in a user folder, and you can't create anything besides a user in a user folder.
To delete an existing user from a user folder, select the user and click the Delete button. Remember, like all Zope actions, this can be undone if you make a mistake.
Zope can contain multiple user folders at different locations in the object hierarchy. A Zope user cannot access resources above the user folder they are defined in. Where your user account is defined determines what Zope resources you can access.
If your account is defined in a user folder in the root folder, you have access to the root folder. This is probably where the account you are using right now is defined. You can however, define users in any Zope folder.
Consider the case of a user folder at /BeautySchool/Hair/acl_users. Suppose the user Ralph Scissorhands is defined in this user folder. Ralph cannot log into to Zope above the folder at /BeautySchool/Hair. Effectively Ralph's view of the Zope site is limited to things in the BeautySchool/Hair folder and below. Regardless of the roles assigned to Ralph, he cannot access protected resources above his location.
Using this technique it's easy to build simple security policies. One of the most common Zope management patterns is to place related objects in a folder together and then create a user folder in that folder to define people who are responsible for those objects.
For example suppose people in your organization wear uniforms. You are creating an intranet that provides information about your organization, including information about uniforms. You might create a uniforms folder somewhere in the intranet Zope site. In that folder you could put objects such as pictures of uniforms and descriptions for how to wear and clean them. Then you could create a user folder in the uniforms folder and create an account for the head tailor. When a new style of uniform comes out the tailor doesn't have to ask the web master to update the site, he or she can update their own section of the site without bothering anyone else. Additionally, the head tailor cannot log into any folder above the uniforms folder, which means the head tailor cannot manage any objects other than those in the uniforms folder.
This security pattern is called delegation, and is very common in Zope applications. By delegating different areas of your Zope site to different users, you can take the burden of site administration off of a small group of managers and spread that burden around to different specific groups of users. Later in the chapter we'll look at other security patterns.
It may be that you don't want to manage your user account through the web. This may be because you already have a user database, or perhaps you want to use other tools to maintain your account information. Zope allows you to use all sorts of authentication techniques with alternate user folders. You can find many alternate user folders on the Zope web site at http://www.zope.org/Products/user_management. At the time of this writing there are 19 contributed alternate user folders. Here is a sampling of some of the more popular alternative user folders available.
Some user folders provide alternate log in and log out controls such as log in web forms, rather than browser HTTP authorization controls. Despite this variety, all user folders use the same general log in procedure of prompting you for credentials when you access a protected resource.
While most users are managed with user folders of one kind or another, Zope has a few special user accounts that are not managed with user folder.
Zope provides three special user accounts which are not defined with user folders, the anonymous user, the emergency user, and the initial manager. The anonymous user is used frequently, while the emergency user and initial manager accounts are rarely used but are important to know about.
Zope has a built-in user account for guests, the anonymous user. If you don't have a user account on Zope, you'll be considered to be the anonymous user.
The anonymous user has security controls like any other, it has the role Anonymous. By default the Anonymous role can only access public resources, and can't change any Zope objects. You can tailor this policy, but most of the time you'll find the default anonymous security settings adequate.
As we mentioned earlier in the chapter, you must try to access a protected resource in order for Zope to authenticate you. The upshot is that even if you have a user account, Zope will consider you anonymous until you have logged in.
Zope has a special user account for emergency use known as the emergency user. We discussed the emergency user briefly in Chapter 2, "Using Zope". The emergency user is not restricted by normal security settings. However, the emergency user cannot create any new objects with the exception of new user objects.
The emergency user is only really useful for two things: fixing messed up permissions, and creating manager accounts. As we saw in Chapter 2, "Using Zope" you can log in as the emergency user to create a manager account when none exist. After you create a manager account you should log out as the emergency user and log back in as the manager.
Another reason to use the emergency user account is if you
lock yourself out of Zope by removing permissions you need to
manage Zope. In this case log in as the emergency user and
make sure that your manager account has the 'View management
screens' and Change permissions permissions. Then log out
and log back with your manager account and you should have
enough access to fix anything else that is broken.
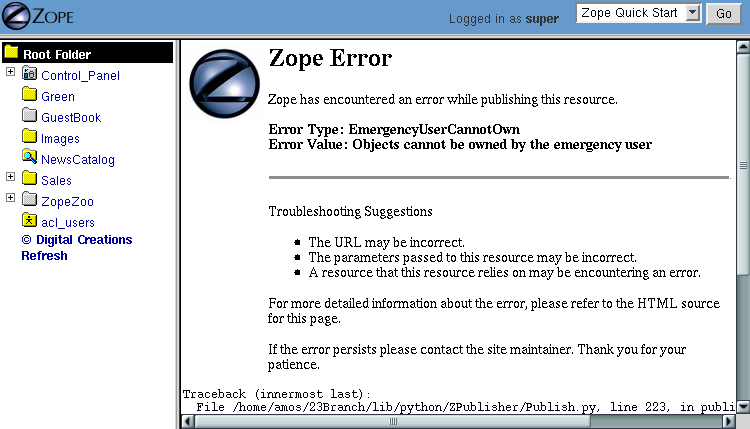
A common problem with the emergency user is trying to create a new object.
Figure 6-2 Error caused by trying to create a new object when logged in as the Emergency User.
The error in Figure 6-2 lets you know that the emergency user cannot create new objects. The reason for this is a bit complex but will become clearer later in the chapter when we cover ownership. The short version of the story is that it would be unsafe for the emergency user to create objects since they would not be subject to the same security constraints as other objects.
Unlike normal user accounts that are defined through the web. The Emergency User account is defined in the filesystem. You can change the Emergency User account by editing the access file in the Zope directory. Zope comes with a command line utility, zpasswd.py to manage the Emergency User account. Run zpasswd.py by passing it the access file path:
          $ python zpasswd.py access

          Username: superuser
          Password:
          Verify password:

          Please choose a format from:

          SHA - SHA-1 hashed password
          CRYPT - UNIX-style crypt password
          CLEARTEXT - no protection.

          Encoding: SHA
          Domain restrictions:
The zpasswd.py script steps you through the process of
creating a Emergency User account. Note that when you type in your
password it is not echoed to the screen. You can also run
zpasswd.py with no arguments to get a list of command line
options.
The Initial manager account is created by the Zope installer so you can log into Zope the first time. When you first install Zope you should see a message like this:
          creating default inituser file
          Note:
                  The initial user name and password are 'admin'
                  and 'IVX3kAwU'.

                  You can change the name and password through the web
                  interface or using the 'zpasswd.py' script.
This lets you know the initial manager's name and password. You can use this information to log in to Zope for the first time as a manager. For there you can create additional user accounts.
Initial users are defined in a similar way to the emergency user; they are defined in a file on the filesystem call inituser. The zpasswd.py program can be used to edit this file the same way it is used to edit the emergency user access file:
          $ python zpasswd.py inituser

          Username: bob
          Password:
          Verify password:

          Please choose a format from:

          SHA - SHA-1 hashed password
          CRYPT - UNIX-style crypt password
          CLEARTEXT - no protection.

          Encoding: SHA
          Domain restrictions:
This will create a new initial user called "bob" and set its password (the password is not echoed back to you when you type it in). When Zope starts, it checks this file for users and makes sure they can log into Zope. Normally, initial users are created by the Zope installer for you, and you shouldn't have to worry about changing them. If you want to create additional users, you'll do it through the Zope web management interface.
So far we've covered how users and user folders control authentication. Next we'll look at how to control authorization with security policies.
Zope security policies control authorization; they define who can do what. Security policies describe which roles have which permissions. Roles label classes of users, and permissions protect objects. Thus, security policies define which classes of users (roles) can take what kinds of actions (permissions) in a given part of the site.
Rather than stating which specific user can take which specific action on which specific object, Zope allows you to define which kinds of users can take which kinds of action in which areas of the site. This sort of generalizing makes your security policies simple and more powerful. Of course, you can make exceptions to your policy for specific users, actions, and objects.
In the following sections we'll examine roles, permissions and security policies more closely with an eye to building simple and effective security policies.
Zope users have roles that define what kinds of actions they can take. Roles define classes of users such as Manager, Anonymous, and Authenticated.
Roles are similar to UNIX groups in that they abstract groups of users. And like UNIX groups, Zope users can have more than one role.
Roles make it easier for you to manage security. Instead of defining what every single user can do, you can simply set a couple different security policies for different user roles.
Zope comes with four built-in roles:
For basic Zope sites you can get by with Manager and Anonymous. For more complex sites you may want to create your own roles to classify your users into different groups.
To create a new role go to the Security tab and scroll down to the bottom of the screen. Type the name of the new role in the User defined role field, and click Add Role. Role names should be short one or two word descriptions of a type of user such as "Author", "Site Architect", or "Designer". You should pick role names that are relevant to your application.
You can verify that your role was created, noticing that there is now a role column for your new role at the top of the screen. You can also delete a role by selecting the role from the select list at the bottom of the security screen and clicking the Delete Role button. You can only delete your own custom roles, you cannot delete any of the "stock" roles that come with Zope.
You should notice that roles can be used at the level where they are defined and below in the object hierarchy. So if you want to create a role that is appropriate for your entire site create it in the root folder.
In general roles should be applicable for large sections of your site. If you find yourself creating roles to limit access to parts of your site, chances are there are better ways to accomplish the same thing. For example you could simply change the security settings for existing roles on the folder you want to protect, or you could define users deeper in the object hierarchy to limit their access. Later in the chapter we'll look at more examples of how to define security policies.
Local roles are an advanced feature of Zope security. Users can be given extra roles when working with a certain object. If an object has local roles associated with a user then that user gets those additional roles while working with that object.
For example, if a user owns an object they are usually given the additional local role of Owner while working with that object. A user might not have the ability to edit DTML Methods in general, but for DTML Methods they own, the user could have access to edit the DTML Method through the Owner local role.
Local roles are a fairly advanced security control and are not needed very often. Zope's automatic control of the Owner local role is likely the only place you'll encounter local roles.
The main reason you might want to manually control local roles is to give a specific user special access to an object. In general you should avoid setting security for specific users if possible. It is easier to manage security settings that control groups of users instead of individuals.
Permissions define what actions can be taken with Zope objects. Just as roles abstract users, permissions abstract objects. For example, many Zope objects, including DTML Methods and DTML Documents, can be viewed. This action is protected by the View permission.
Some permissions are only relevant for one type of object, for example, the Change DTML Methods permission only protects DTML Methods. Other permissions protect many types of objects, such as the FTP access and WebDAV access permissions which control whether objects are available via FTP and WebDAV.
You can find out what permissions are available on a given object by going to the Security management tab.
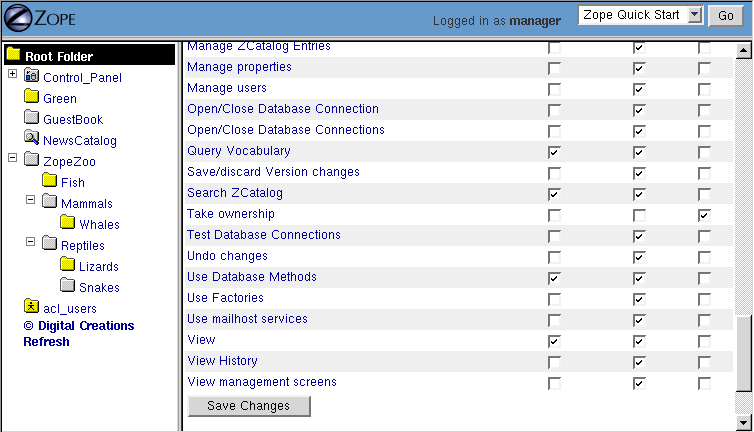
Figure 6-3 Security settings for a mail host object.
As you can see in Figure 6-3, a mail host has a limited pallet of permissions available. Contrast this to the many permissions that you see when setting security on a folder.
Security policies are where roles meet permissions. Security policies define who can do what in a given part of the site.
You can set security policies on almost any Zope object. To set a security policy, go the Security tab. For example, click on the security tab of the root folder.
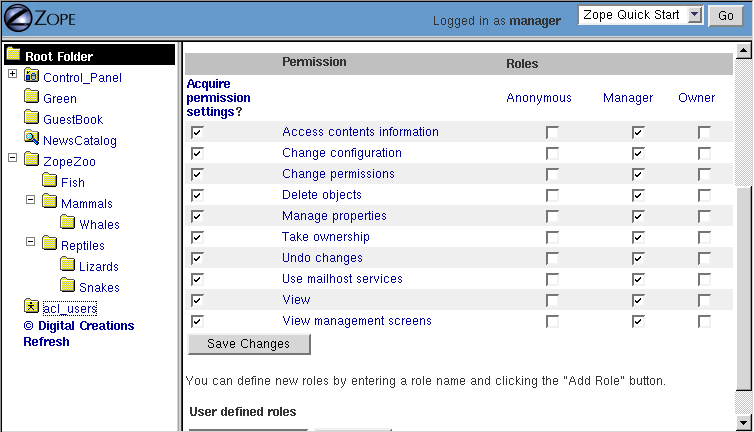
Figure 6-4 Security policy for the root folder.
There is a lot going on in Figure 6-4. In the center of the screen is a grid of check boxes. The vertical columns of the grid represent roles, and the horizontal rows of the grid represent permissions. Checking the box at the intersection of a permission and a role grants users with that role the ability to take actions protected by that permission.
You'll notice that Zope comes with a default security policy that allows managers to perform most tasks, and anonymous users to perform only a couple. You can tailor this policy to suit your needs, by changing the security settings in the root folder.
For example, you can make your site private by disallowing anonymous users the ability to view any web pages. To do this deny all anonymous users View access by unchecking the View Permission where it intersects the Anonymous role. You can make your entire site private by making this security policy change in the root folder. If you want to make one part of your site private, you could make this change in the folder you want to make private.
This example points out a very important point about security policies: they control security for a given part of the site only. The only global security policy is the one on the root folder.
How do different security policies interact? We've seen that you can create security policies on different objects, but what determines which policies control which objects? The answer is that objects use their own policy if they have one, additionally they acquire their parents' security policies through a process called acquisition.
Acquisition is a mechanism in Zope for sharing information among objects contained in a folder and its subfolders. The Zope security system uses acquisition to share security policies so that access can be controlled from high-level folders.
You can control security policy acquisition from the Security tab. Notice that there is a column of check boxes to the left of the screen labeled Acquire permission settings. Every check box in this column is checked by default. This means that security policy will acquire its parent's setting for each permission to role setting in addition to any settings specified on this screen. Keep in mind that for the root folder (which has no parent to acquire from) this left most check box column does not exist.
So for example, suppose you want to make this folder private. As we saw before this merely requires denying the Anonymous role the View permission. But as you can see on this screen, the Anonymous role doesn't have the View permission, and yet this folder is not private. Why is this? The answer is that the Acquire permission settings option is checked for the View permission. This means that the current settings are augmented by the security policies of this folder's parents. Somewhere above this folder the Anonymous role must be assigned to the View permission. You can verify this by examining the security policies of this folder's parents. To make the folder private we must uncheck the Acquire permission settings option. This will ensure that only the settings explicitly in this security policy are in effect.
In general, you should always acquire security settings unless you have a specific reason not too. This will make managing your security settings much easier as much of the work can be done from the root folder.
Next we'll consider some examples of how to create effective security policies using the tools that you've learned about so far in this chapter.
The basic concepts of Zope security are simple: roles and permissions combine to create security policies, and users actions are controlled by these policies. However these simple tools can be put together in many different ways. This can make managing security complex. Let's look at some basic patterns for managing security that provide good examples of how to create an effective and easy to manage security architecture.
Here are a few simple guidelines for Zope security management. The security patterns that follow offer more specific recipes, but these guidelines give you some guidance when you face uncharted territory.
Rules one and two are closely related. Both are part of a more general rule for Zope site architecture. In general you should refactor your site to locate related resources and users near each other. Granted it's never possible to force resources and users into a strict hierarchy. However, a well considered arrangement of resources and users into folders and sub-folders helps tremendously.
Regardless of your site architecture, try to keep things simple. The more you complicate your security settings the harder time you'll have understanding it, managing it and making sure that it's effective. For example, limit the number of new roles you create, and try to use security policy acquisition to limit the number of places you have to explicitly define security settings. If you find that your security policies, users, and roles are growing into a complex thicket, you should rethink what you're doing; there's probably a simpler way.
The most basic Zope security pattern is to define a global security policy on the root folder and acquire this policy everywhere. Then as needed you can add additional policies deeper in the object hierarchy to augment the global policy. Try to limit the number of places that you override the global policy. If you find that you have to make changes in a number of places, consider consolidating the objects in those separate locations into the same folder so that you can make the security settings in one place.
You should choose to acquire permission settings in your sub-policies unless your sub-policy is more restrictive than the global policy. In this case you should uncheck this option for the permission that you want to restrict.
This simple pattern will take care of much of your security needs. Its advantages are that it is easy to manage and easy to understand. These are extremely important characteristics for any security architecture.
This security pattern is very central to Zope, and is part of what gives Zope its unique flavor. Zope encourages you to collect like resources in folders together and then to create user accounts in these folders to manager their contents.
Lets say you want to delegate the management of the Sales folder in your Zope site over to the new sales web manager, Steve. First, you don't want Steve messing with anything other than the Sales folder, so you don't need to add him to the acl_users folder in the root folder. Instead, create a new user folder in the Sales folder.
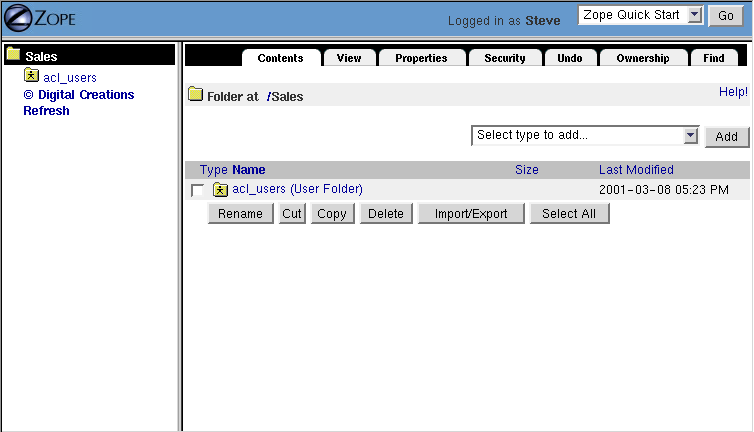
Now you can add Steve to the user folder in Sales and give him the Role Manager. Steve can now log directly into the Sales folder to manage his area of control by pointing his browser to http://www.zopezoo.org/Sales/manage.
Figure 6-5 Managing the Sales folder.
Notice in Figure 6-5, the navigation tree on the left shows that Sales is the root folder. The local manager defined in this folder will never have the ability to log into any folders above Sales so it is shown as the top folder.
This pattern is very powerful since it can be applied recursively. For example, Steve can create a sub-folder for multi-level marketing sales. Then he can create a user folder in the multi-level marketing sales folder to delegate control of this folder to the multi-level marketing sales manager. And so on. This is a recipe for huge web sites managed by thousands of people.
The beauty of this pattern is that higher level managers need not concern themselves too much with what their underlings do. If they choose they can pay close attention, but they can safely ignore the details since they know that their delegates cannot make any changes outside their area of control, and they know that their security settings will be acquired.
The local manager pattern is powerful and scalable, but it takes a rather coarse view of security. Either you have access or you don't. Sometimes you need to have more fine grained control. Many times you will have resources that need to be used by more than one type of person. Roles provides you with a solution to this problem. Roles allow you to define classes of users and set security policies for them.
Before creating new roles make sure that you really need them. Suppose that you have a web site that publishes articles. The public reads articles and managers edit and publish articles, but there is a third class of user who can author articles, but not publish or edit them.
One solution would be to create an authors folder where author accounts are created and given the Manager role. This folder would be private so it could only be viewed by managers. Articles could be written in this folder and then managers could move the articles out of this folder to publish them. This is a reasonable solution, but it requires that authors work only in one part of the site and it requires extra work by managers to move articles out of the authors folder. Also, consider that problems that result when an author wants to update an article that has been moved out of the authors folder.
A better solution is to add an Author role. Adding a role helps us because it allows access controls not based on location. So in our example, by adding an author role we make it possible for articles to be written, edited, and published anywhere in the site. We can set a global security policy that gives authors the ability to create and write articles, but doesn't grant them permissions to publish or edit articles.
Roles allow you to control access based on who a user is, not just where they are defined.
Roles can help you overcome another subtle problem with the local manager pattern. The problem is that the local manager pattern requires a strict hierarchy of control. There is no provision to allow two different groups of people to access the same resources without one group being the manager of the other group. Put another way, there is no way for users defined in one part of the site to manage resources in another part of the site.
Let's take an example to illustrate the second limitation of the local manager pattern. Suppose you run a large site for a pharmaceutical company. You have two classes of users, scientists and salespeople. In general the scientists and the salespeople manage different web resources. However, suppose that there are some things that both types of people need to manage, such as advertisements that have to contain complex scientific warnings. If we define our scientists in the Science folder and the salespeople in the Sales folder, where should we put the AdsWithComplexWarnings folder? Unless the Science folder is inside the Sales folder or vice versa there is no place that we can put the AdsWithComplexWarnings folder so that both scientists and salespeople can manage it. It is not a good political or practical solution to have the salespeople manage the scientists or vice versa; what can be done?
The solution is to use roles. You should create two roles at a level above both the Science and Sales folders, say Scientist, and SalesPerson. Then instead of defining the scientists and salespeople in their own folders define them higher in the object hierarchy so that they have access to the AdsWithComplexWarnings folder.
When you create users at this higher level, you should not give them the Manager role, but instead give them Scientist or SalesPerson as appropriate. Then you should set the security policies. On the Science folder the Scientist role should have the equivalent of Manager control. On the Sales folder, the Salesperson role should have the same permissions as Manager. Finally on the AdsWithComplexWarnings folder you should give both Scientist and Salesperson roles adequate permissions. This way roles are used not to provide different levels of access, but to provide access to different locations based on who you are.
Another common situation when you might want to employ this pattern is when you cannot define your managers locally. For example, you may be using an alternate user folder that requires all users to be defined in the root folder. In this case you would want to make extensive use of roles to limit access to different locations based on roles.
This wraps up our discussion of security patterns. By now you should have a reasonable grasp of how to use user folders, roles, and security policies, to shape a reasonable security architecture for your application. Next we'll cover two advanced security issues, how to perform security checks, and securing executable content.
Most of the time you don't have to perform any security checks. If a user attempts to perform a secured operation, Zope will prompt them to log in. If the user doesn't have adequate permissions to access a protected resource, Zope will deny them access. However, sometimes you may wish to manually perform security checks. The main reason to do this is to limit the choices you offer a user to those for which they are authorized. This doesn't prevent a sneaky user for trying to access secured actions, but it does reduce user frustration, by not giving to user the option to try something that will not work.
The most common security query asks whether the current user has a given permission. For example, suppose your application allows some users to upload files. This action may be protected by the "Add Documents, Images, and Files" standard Zope permission. You can test to see if the current user has this permission in DTML:
      <dtml-if expr="_.SecurityCheckPermission(
                    'Add Documents, Images, and Files', this())">

        <form action="upload">
        ...
        </form>

      </dtml-if>
The SecurityCheckPermission function takes two arguments, a
permission name, and an object. In this case we pass this() as
the object which is a reference to the current object. By passing
the current object, we make sure that local roles are taken into
account when testing whether the current user has a given
permission.
You can find out about the current user by accessing the user in DTML. The current user is a Zope object like any other and you can perform actions on it using methods defined in the API documentation.
Suppose you wish to display the current user name on a web page to personalize the page. You can do this easily in DTML:
<dtml-var expr="_.SecurityGetUser().getUserName()">
You can retrieve the currently logged in user with the SecurityGetUser DTML function. This DTML fragment tests the current user by calling the getUserName method on the current user object. If the user is not logged in, you will get the name of the anonymous user, which is Anonymous User.
Next we'll look at another advanced issue which affects security of DTML and scripts.
You've now covered all the basics of Zope security. What remains are the advanced concepts of ownership and executable content. Zope uses ownership to associate objects with users who create them, and executable content refers to objects such as Scripts, DTML Methods and Documents, which execute user code.
For small sites with trusted users you can safely ignore these advanced issues. However for large sites where you allow untrusted users to create and manage Zope objects, it's important to understand ownership and securing executable content.
The basic scenario that motivates both ownership and executable content controls is a Trojan horse attack. A Trojan horse is an attack on a system that operates by tricking a user into taking a potentially harmful action. A typical Trojan horse masquerades as a benign program that causes harm when you unwittingly run it.
All web-based platform including Zope and many others are subject to this style of attack. All that is required is to trick someone into visiting a URL that performs a harmful action.
This kind of attack is very hard to protect against. You can trick someone into clicking a link fairly easily, or you can use more advanced techniques such as Javascript to cause a user to visit a malicious URL.
Zope offers some protection from this kind of Trojan horse. Zope helps protect your site from server-side to Trojan attacks by limiting the power of web resources based on who authored them. If an untrusted user author a web page, then the power of the web pages to do harm to unsuspecting visitors will be limited. For example, suppose an untrusted user creates a DTML document or Python script that deletes all the pages in your site. If they attempt to view the page, it will fail since they do not have adequate permissions. If a manager views the page, it will also fail, even though the manager does have adequate permissions to perform the dangerous action.
Zope uses ownership information and executable content controls to provide this limited protection.
When a user creates a Zope object, they own that object. An object that has no owner is referred to as unowned. Ownership information is stored in the object itself. This is similar to how UNIX keeps track of the owner of a file.
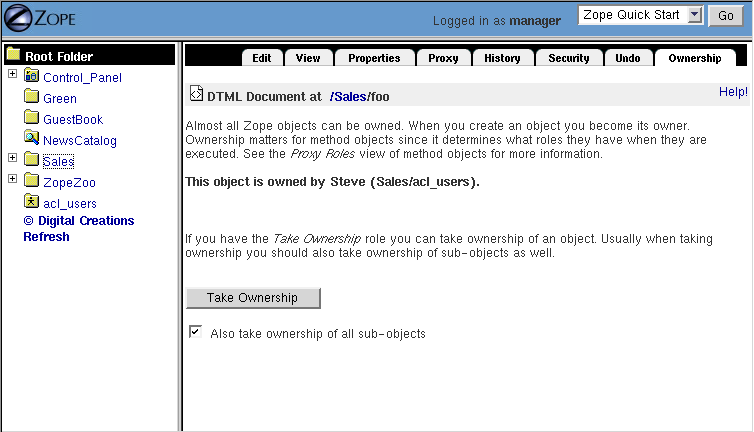
You find out how an object is owned by viewing the Ownership management tab, as shown in Figure 6-6.
Figure 6-6 Managing ownership settings.
This screen tells you if the object is owned and if so by whom. If the object is owned by someone else, and you have the Take ownership permission, you can take over the ownership of an object. You also have the option of taking ownership of all sub-objects by checking the Take ownership of all sub-objects box. Taking ownership is mostly useful if the owner account has been deleted, or if objects have been turned over to you for continued management.
As we mentioned earlier in the chapter ownership affects security policies because a user will have the local role Owner on objects they own. However, ownership also affects security because it controls the role's executable content.
Through the web you can edit scripts on some kinds of Zope objects. These objects including DTML Documents, DTML Methods, SQL Methods, Python-based Scripts, and Perl-based Scripts. These objects are said to be executable since they run scripts that are edited through the web.
When you visit an executable object by going to its URL or calling it from DTML or a script, Zope runs the object's script. The script is restricted by the roles of the object's owner and your roles. In other words an executable object can only perform actions that both the owner and the viewer are authorized for. This keeps an unprivileged user from writing a harmful script and then tricking a powerful user into executing the script. You can't fool someone else into performing an action that you are not authorized to perform yourself. This is how Zope uses ownership is used to protect against server-side Trojan horse attacks.
Sometimes Zope's system of limiting access to executable objects isn't exactly what you want. Sometimes you may wish to clamp down security on an executable object despite whoever may own or execute it as a form of extra security. Other times you may want to provide an executable object with extra access to allow an unprivileged viewer to perform protected actions. Proxy roles provide you with a way to tailor the roles of an executable object.
Suppose you want to create a mail form that allows anonymous
users to send email to the webmaster of your site. Sending email
is protected by the Use mailhost services
permission. Anonymous users don't normally have this permission
and for good reason. You don't want just anyone to be able to
anonymously send email with your Zope server.
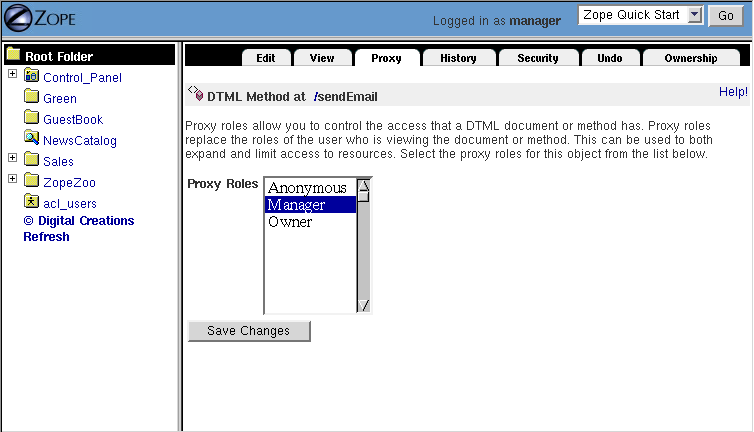
The problem with this arrangement is that your DTML Method that sends email will fail for anonymous users. How can you get around this problem? The answer is to set the proxy roles on the DTML Method that sends email so that when it executes it has the "Manager" role. Visit the Proxy management tab on your DTML Method, as shown in Figure 6-7.
Figure 6-7 Proxy role management.
Select Manager and click the Change button. This will set the proxy roles of the mail sending method to Manager. Note you must have the Manager role yourself to set it as a proxy role. Now when anyone, anonymous or not runs your mail sending method, it will execute with the Manager role, and thus will have authorization to send email.
Proxy roles define a fixed set of the permissions of executable content. Thus you can also use them to restrict security. For example, if you set the proxy roles of a script to Anonymous role, then the script will never execute any other roles besides Anonymous despite the roles of the owner and viewer.
Use Proxy roles with care, since they can be used skirt the default security restrictions.
Security consists of two processes, authentication and authorization. User folders control authentication, and security policies control authorization. Zope security is intimately tied with the concept of location; users have location, security policies have location, even roles can have location. Creating an effective security architecture requires attention to location. When in doubt refer to the security usage patterns discussed in this chapter.
In the next chapter we'll switch gears and explore advanced DTML. DTML can be a very powerful tool for presentation and scripting. You'll find out about many new tags, and will take a look at some DTML-specific security controls that were not covered in this chapter.